In an age where GPS devices and route planners guide us through daily life, many people – myself included – have become so reliant on them that we feel lost when they fail. If I use GPS to reach a destination, I often pay little attention to the actual route or the landmarks I pass.
In diving, we begin addressing this kind of situational awareness once a student moves beyond the Open Water Diver level. Our goal is to develop the ability to recognize patterns, landmarks and features on the reef so that a diver can navigate back to the entry point without much delay.
During Advanced Open Water training, especially when we discuss navigation, we encourage divers to look back and memorize the route they have taken. We use natural navigation techniques alongside the compass, and we always remind divers to observe coral formations from both directions – they often look very different on the way back.
In cave diving, we rely heavily on staying close to the guideline, which serves as our lifeline to the exit, but while the line is crucial, it represents only part of how an experienced cave diver navigates.
For simpler dives along a main line, like those done in Intro to Cave training, back-referencing can be relatively straightforward. For example, while installing the primary line, look back toward the entrance to ensure you have not created a line trap. Take note of how long it took you to reach the main line and estimate the distance. In an emergency you will be able to swim out more quickly than it took to lay the line, as you will leave it in place; this gives you your first point of reference; an approximate time to exit in case of an emergency.
As you progress deeper into the cave, take note of sharp turns, depth changes or distinctive features; these can become mental (or written down) waypoints that are easy to reference by tracking your elapsed time on exit.
In caves with permanent line markers, these become useful waypoints too. You can start building a mental map, learning to differentiate between distance markers and those that indicate side passages or jumps. Pay attention to the direction the markers point, their color and their position relative to tie-off points. Record the time it takes to reach each marker on the way in so you can cross-reference on the way out. Typically, as I learned it, the return trip should be faster, so the times will not always match exactly, but the pattern will.
Experienced cave divers go even further: they read the cave itself, not just the line. They learn to recognize the shapes of tunnels, the color of walls and sediments, and distinctive flowstone formations. When you start “listening” to the cave, it tells you a story. You begin to form a mental picture of each unique room, which serves as a strong visual reference for your return. As the saying goes, “Dive the cave, not the line.”
Referencing markers along the line is usually acknowledged by the team, and later in training or while doing more complex cave dives, any navigation needs to be acknowledged by the team, no matter what kind of marking protocol you use namely team versus individual marking. Each navigation is set up so that the exit side is always clear, either by placing a cookie on the exit side of a T or by just the fact that your temporary line is the line that connects your continuous line back to open water, or by tie-ing into your arrow when you start a jump.
There is no specific signal needed to confirm that each team member has completed back-referencing. In fact, too much communication can create confusion. Personally, I use the “way to surface” signal only if I am explicitly asking a teammate to point out the exit direction.
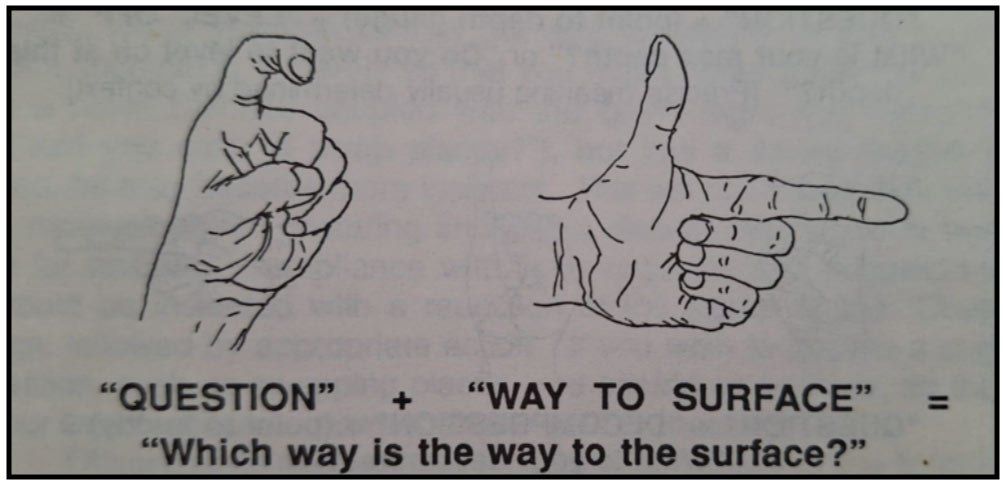
(Picture of signal sequence taken from the Cave Diving Communication Manual by Joe Prosser and H. V. Grey, NSS-CDS.)
The back-referencing techniques you learn in Intro to Cave Diving continue to apply in more advanced scenarios; But now, you’ll pay special attention to navigational decisions and treat them as a distinct waypoints. It’s a good practice to stop and write this information down; this builds and strengthens your back-referencing skills over time.
When the dive is turned and the team heads back toward the exit, tracking the time between navigational points helps every diver individually to confirm that they’re on the right route. This technique allows for quick recognition and correction of mistakes. Each diver does this independently, although the first diver will signal “way to exit” when passing a navigation point. The team leader as last diver retrieves the jump line or any other navigational markers that were installed. While individual and team marking protocols differ, the fundamentals of back-referencing remain consistent.
My personal approach to cave diving and instruction is to keep communication to the necessary minimum, reducing the risk of miscommunication. But most new cave divers need to learn how to see the dive holistically, to always know where they are in the system. Back-referencing along with map reading, detailed pre-dive planning, debriefing, and logging the dive information are the tools that make this possible.
If all of this sounds complicated or overwhelming, don’t worry – it isn’t. I’ll gladly walk you through my approach during a workshop and a few guided cave dives (for certified divers) or during formal training. Reach out by WhatsApp or email if you’re interested.
0 Comments